We wrote an article for Food52! Check it out here!

It wasn’t until my boyfriend pulled the drill out of the refrigerator that we heard the hissing sound. We stood silently, frozen by the very long, very loud noise, wide-eyed and looking to each other for an explanation. In the process of turning our basement refrigerator into a meat-curing chamber, we’d drilled right through the freon line. In other words, our fridge—and meat-curing chamber dreams—were totalled. Our obsession with making homemade salami came to a screeching halt with the decimation of our $200 fridge. And we didn’t even have any spicy meat snacks to show for it. The next day, we scoured Craigslist for Fridge #2.
I should probably explain to you why we were taking a power tool to our refrigerator: The short answer is that a sausage with dreams of becoming a salami must spend time in the right environment. Temperature, humidity, airspeed, and ventilation are all important. A doctored refrigerator is the home cook’s best shot at creating a space to control these factors. When my boyfriend, Daniel, drilled into the freon line, we were trying to install an air ventilation system into Fridge #1 (RIP). On Fridge #2—thank you, Craigslist!—a friend recommended we drill the vent through the door to avoid gas lines. With this pearl of wisdom, one successful Craigslist deal, and three hours of trying to get Fridge #2 into our basement, we struck out on our journey towards spicy meat snacks.
It didn’t take long for us to realize that making charcuterie is hard. It’s also completely unnecessary. Humans have salted and dried meat since prehistory as a method to preserve, store, and easily transport protein. In New York, circa 2016, though, access to meat is as simple as finding a grocery store and a (working) refrigerator. The three- to eight-week process of making charcuterie offers the home cook practically nothing in convenience, nutrition, or economy. But if you do it—if you really stick it out to the end and fail (like we did) then try again and finally succeed—it is completely worth it. You will have created a piece of art. A delicious piece of art. Convinced yet? Here is an introduction to making your own sausage:

Before You Start
I don’t want to scare you away, but making charcuterie is hard and isn’t for everyone. And while anyone with enough interest, curiosity, and attention to detail can be successful, it is important to recognize that preparing and eating uncooked meat can be dangerous if the right precautions are not taken. Educate yourself thoroughly before attempting to make salami.
By far, the best and most comprehensive book available on making dried sausage is The Art of Making Fermented Sausages. Below I'll explain some high-level details about how to make dried sausage but this is just meant to be an introduction to the process. If you are serious about doing this at home please read the book cover to cover—it will tell you the science behind fermenting sausage, how to set up your curing chamber (stay away from the freon line), and it will give you recipes for different types of dried sausage. It also has a chapter all about safety and cleanliness, which is extremely important.
What You’ll Need
- Food scale: Everything is measured in grams when making fermented sausage, including the spices.
- Curing salt #2 (6.25% sodium nitrite, 4% sodium nitrate and 89.75% salt):Adding nitrites to your meat will improve flavor, inhibit growth of dangerous bacteria—most specifically botulism-causing bacteria—and tenderize the meat. Cure #2 is used for slow-fermented meat whereas Cure #1 is added to fast-fermented meat.
- Dextrose: Bacteria eats dextrose and adding this in the initial stage of making fermented sausage is crucial to lowering the acidity and stunting bacteria growth.
- T-SPX: This freeze-dried bacteria culture is specifically formulated for slow-fermenting sausages. T-SPX eats sugars, produces lactic acid, and protects bacteria from dangerous competing bacterias. T-SPX also gives the sausage a mild flavor that is typical for South European salami types such as Milano.
- Mold 600: This helps the sausage dry properly and ensures that no black mold grows on the outside of the sausage. It also gives the sausage aroma and flavor.
- Hog casings
- Meat grinder and sausage stuffer
- Cool, dry area: Or in our case, Fridge #2
How to Make Sausage
The entire process of fermenting and aging sausages is about creating conditions that favor “good bacteria” over “bad bacteria.” Good bacteria sounds odd, but cheese, yogurt, alcohol, vinegar, bread, and even our beloved kombucha rely on the presence and activity of friendly microorganisms. Before you start drying sausage, it’s also useful to become familiar with making fresh sausage, which we learned from a number of different resources, but primarily from the book, Home Production of Quality Meats and Sausages.
The First 3 Days: Creating “Good Bacteria”
The sausage is stuffed with 3% salt and a little sodium nitrite. Salt protects the sausage from a variety of harmful bacteria. It is also stuffed with some sugar, which will serve as food for “good bacteria.” The best-tasting and most aromatic dried sausages originally came from locations with a natural abundance of good bacteria in the environment. Imagine a hill in Tuscany where sausages have been made for a hundred years (dreamy). Today, scientists have isolated those specific strains; freeze dried them and made them available to order online. Unless you live on that hill in Tuscany, use freeze-dried cultures.
During the first 72 hours after a sausage is stuffed, it will hang in your curing chamber at 70° F with very high humidity (95%) and mild air speed. The bacteria culture will begin eating the sugar in the sausage and producing lactic acid. This will increase the acidity in the sausage, making it even less hospitable for bad bacteria. It is crucial, though, that the sausage does not become too acidic. If it does, the flavor of the finished sausage will be too tart. The degree to how much lactic acid is produced depends on how much sugar is put into the sausage, the type of the sugar, and the temperature fermentation takes place in. The reason it must be kept at such high humidity is to prevent it from succumbing to the dreaded “case hardening.” If the outside of the sausage dries and hardens too soon, the moisture from inside the sausage will not be able to escape and your salami will be ruined.
The Next 2 to 8 Weeks: Drying Your Sausage
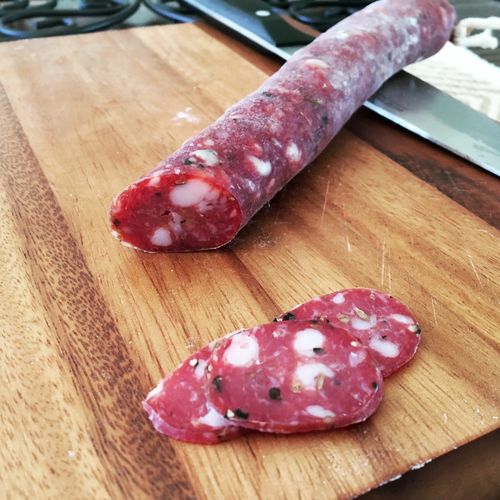
After about three days, the bacteria will have consumed all the sugar in the sausage and the acidity will be at a stable level. At this point, the sausage is ready to dry. The temperature should be dropped to about 55° F and humidity dropped to around 80 to 85%. During the drying period, good bacteria slowly breaks down the proteins of the meat and produces those deep, funky umami flavors that make aged salami so delicious. Depending on the thickness of the salami, this drying period could take anywhere from 2 to 8 weeks. Your sausage is ready once it’s lost 30% of its weight.
When it’s done, pop open a bottle of wine, serve some cheese, and invite friends and family over to enjoy your impressive accomplishment and a delicious treat!
My Recipe for Italian Fennel Sausage
Historically, people have used all different things to flavor their cured meats, including wine and liquor, spices, and vinegars. This part is up to you and what you like. But in case you also love traditional Italian fennel and red wine-flavored sausage, here's our recipe:
- 70% (7.7 pounds) lean pork
- 30% (3.3 pounds) pork back fat
- 140 grams salt
- 12 grams cure #2,
- 15 grams dextrose,
- 15 grams black pepper,
- 10 grams coriander,
- 10 grams fennel seed
- 10 grams crushed red pepper
- 15 grams garlic powder
- .6 grams T-SPX culture